
Humberside Geologist no 12
Starting a small fossil collection
Copyright Hull Geological Society.
by Mike Home
Humberside Geologist no 12
Starting a small fossil collection
Copyright Hull Geological Society.
by Mike Home
Is your collection of fossils taking up too much space? If it is why not collect something smaller? Someone once told me that you could store your life's work in a matchbox, if you collect microfossils! It is probably true. You could store nearly 200,000 average sized foraminifera in the average matchbox and over one and a half million in the larger household' sized matchbox.
Apart from the saving in storage space what are the other advantages in collecting small fossils? They are easier to collect because you just collect a sample of the sediment and don't have to spend hours in the cold and wet looking for them. There is little conflict with conservation, because you don't have to smash rock faces to bits to collect you samples. It is very easy to carry out statistical work on the microfossils because your sample of sediment is a random sample from a known horizon. Another two main advantages are that there are usually a lot of microfossils in each sample (e.g. John Neale found 216,000 individuals in a litre of Speeton Clay bed D6G) and because of their small size they are often beautifully preserved.
There are, of course, certain disadvantages. To study true microfossils you will need a certain amount of specialist equipment - a binocular microscope and some good quality sieves. But you can. study mesofossils (middle sized fossils) with just a kitchen sieve and a magnifying glass. You may have to unblock your drains occasionally because of the sediment you wash down the sink. You will need to be very careful about how you label your samples and collection (it is no good leaving samples unlabelled hoping that you will recognise them later - but then you should be labelling your collection carefully anyway, shouldn't you?). Lastly a word of warning, you need to be fit - one cough or sneeze could literally blow away many hours work!
So what do we mean by small fossils'? Well, as far as 1 know, there are no clear definitions, but they may be split into three groups on the basis of their size. There are 'mesofossils' which are roughly from 0. 1 cm to 1 cm in size. These are small macro fossils or parts of macrofossils - such as small gastropods, bivalves, brachiopods and the spines and plates of echinoids, ossicles of crinoids and starfish, and fish teeth. This group of small fossils are usually ignored by both the micropaleontologist, because they are not complete organisms and the macropaleontologist, because they represent broken and thus imperfect individuals. But their study by sieving bulk samples can reveal a lot of information about depositional environments, which is often overlooked simply because most people don't think to sieve the sediment.
'Microfossils' are roughly 0.05 to 2mm in size. These are the remains of complete organisms, the common ones are foraminifera and ostracods. But they are not defined by their size - some foraminifera can grow up to 15cm in diameter but are still considered to be microfossils!
'Nanofossils' are smaller, usually much smaller, and are such things as coccoliths, dinofiagellate cysts and pollen. These need high magnification for their study, and specialist preparation techniques (some quite hazardous), which probably puts them outside the scope of amateurs.
Where would you find small fossils?
They are present in most sedimentary rocks, but for practical reasons some rocks are better to work with than others. The first thing to look for is a rock that is fairly soft or poorly cemented, so that you can dis-agregate the grains to look for the fossils. This will rule out most palaeozoic or older rocks for the amateur. Secondly you will find it easier to work. with sediments that have few grains the same size as the fossils - so sandstones are hard work (because you have to look through a large number of sand grains to find your fossils). Lastly avoid weathered rocks in which the fossils have been dissolved; crystals of gypsum on a clay or shale are a sign that pyrite has rotted and the acid produced has dissolved carbonate fossils.
Good materials to work with are shelly beach sand or silts (for modem and derived specimens). For sedimentary rocks clays and silts are good, soft Chalk and marl bands from the Chalk are very productive, locally the Red Chalk is particularly good and softish oolites can be good too!
The amount you need to collect depends on the sediment and what you are looking for. You may need to collect large samples of many kilos for mesofossils, though some beds are richer than others and you should be able to see if mesofossils are present in the field. For microfossils you will need about 500g to 1 kg of clay, a few hundred grams of chalk or marl band should be enough. Generally ostracods are less common than foraminifera, so if you particularly want to study them you will. need a bigger sample: two or four times as much. After a while your experience will tell you how much you will need.
How should you collect and process you samples?
Starting with the field work, you should carefully log the exposure of rock/sediment that you are interested in. This is easier if there is a previously compiled or published log for comparison. Decide which bed or beds you want to sample, this depends on what sort of study you are trying to do. You might be trying to establish a wide ranging collection or doing a detailed survey of the site, in which case you might sample every change in lithology or at regular measured intervals. But your sampling must be realistic - there is no point in collecting rocks that you cannot process.
Collect your samples from an inconspicuous part of the exposure, don't hack lumps out of the middle of the rock face and spoil the site for other visitors. When collecting your samples you must use clean equipment to avoid contamination. Remove the surface of the sample to discard the weathered material (this is not always possible, but if you do collect weathered material make a note and bear it in mind when you study the fossils). Put the sample into a new sample bag and label the bag carefully with the locality and logged horizon (it is a good idea to allocate sample numbers in the field and stick to them). Enter the details in your field notebook. It is worth labelling the bag in more than one way - writing can rub off the outside of the bag, and paper labels inside can rot away! Remember to clean your trowel/knife/hammer before you collect your next sample.
When you return home enter the sample details into your filing system. If you do not intend to process the samples immediately, it is a good idea to dry them, to stop moulds growing. Knowing the dry weight of the original sediment you process can be useful if you want to calculate the abundance of the fossils in the sediment.
To process the sample, you will want to sieve it to remove fine grained material such as clay, you may also want to remove coarser grained material by sieving also. If it is a modem sand deposit you will probably just have to wash the sample in a sieve under the tap. But for most geological samples you will need to deflocculate the clay, to clean the sample. This is done by putting the sample into a saucepan of water with either a desert spoonful of washing soda or a teaspoonful of Calgon (Sodium
Hexametaphosphate). Do not use an aluminium saucepan, because the washing soda will dissolve it! Boil the sample for between 30 minutes and an hour, until it has a consistency a bit like custard. Then little by little, wash the sample through your sieve under running water. Don't pour it all in at once or the sieve will get blocked up and your sample will overflow. You will get the hang of it after a few times. Keep washing the sample until it looks clean and all the soft clay material has gone through the sieve. You may need to boil the sample in the saucepan a few times, and sometimes admit that you can not get it perfectly clean,
The size of the mesh of the sieve you use will determine what you will find in the sample. If you are keen you should invest in one or more specialist test sieves. These have an accurate and certified mesh size, such as Endecotts sieves, and cost about £50 each. Most foraminfera workers use a 240 mesh (6'j micrometres/micron) sieve, for ostracods a larger size of 100 or 120 mesh will be OK. You could try using a kitchen sieve, this will be fine for looking for mesofossils. A nylon mesh bag, as used for home beer making could be used, perhaps supported in the kitchen sieve; this has a finer mesh and should catch larger microfossils. As an alternative you can also clean the sample by carefully decanting or 'panning' it to remove the lighter clay minerals; this is not as efficient, but if you want to " to clean one or two samples to see what you can find, it does save you the expense of having to get-special sieves.
Remember at all stages to avoid contamination, wash your hands, pans, sieves and other equipment very carefully. Label samples carefully. It is different to working with macrofossils; you cannot tell if you -,et a bit of one sample into the next, and if you loose the label you cannot rely on your memory or experience to sort out any mix ups. My greatest nightmare is that 1 find a new species of microfossil and it turns out to be a bread crumb!
When you are satisfied that your sample is clean, you now have to dry the residue. You can transfer it to a dish, or let it dry on the sieve. But the best way is to wash the residue into a labelled coffee filter paper, in a funnel and let it drain and dry. When dry, store the residue in a clean, labelled sample tube or bag.
Pick you own microfossils.
By now you have cleaned the sample and have a residue which is a lot less bulky that the original (perhaps only 2 per cent of the original weight of some clay samples). It is now time to find your fossils. This is done by systematically looking through the residue and picking out the fossils from the sediment grains. You do this by sprinkling a small amount of the residue thinly onto a tray and looking at it under your microscope or magnifying glass/hand lens. It is a good idea to have a tray divided into numbered squares, which are about the size of you field of view, then you can look over all the material systematically. It is normal to use a tray of a dark matt colour, black or navy blue, in contrast to the sediment. When you spot a fossil you then pick it out into another container using a fine artists paintbrush (size 00 or 000). You can either entangle the fossil between the hairs (but I find that some spring away and are lost this way) or slightly dampen the brush so that the fossil sticks to it temporarily. Some samples will be very rich in fossils and you will find hundreds in half an hour, others may not have so many fossils and you will have to spend a few hours to pick out a representative selection. Some samples may be barren, but that is not very often I find, but it is a risk you must take, even if it is disheartening to spend several hours processing and picking to find no fossils.
You will have to decide what you are looking for and pick accordingly. You may want to be selective and pick out just one type of fossil, or try to get a representative fauna, or for statistical work pick the first 200, or 500, or thousand individuals, regardless of their preservation or type. You may also want to pick out some of the sediment grains also; as with fossils, mineral grains are often better preserved than larger specimens. Again remember to avoid contamination, by keeping samples separate and carefully cleaning everything between samples.
Having found your fossils you will want to store them. This can be done in a sample tube, or a cavity slide. Cavity slides are usually made of card, consisting of a dark coloured card base, a thicker piece of card with a cavity cut in it, and a white thin top card, that you can slip a glass cover-slip under, to keep your fossils in. You can also make or buy slides with a larger cavity that has a numbered grid to help you organise your specimens into species or types. If you like you can paint water soluble Gum Tragacanth on the cavity, so that you can position specimens and hold them in place, the gum can be loosened by wetting, so you can move the specimen.
It is not possible to label your fossils individually but you must label your slide or tube ,with the sample number and you can list the fossils you find on a log sheet. Finding the species names for your fossils is not easy as the literature is mostly in journals. A good starting point is Martin Brasier's book Microfossils'. But then again, when you get down to it, naming macrofossils is not so easy if you want to be really accurate.
What are microfossils?
Two groups of organisms are common, the foraminifera and the ostracoda.
Foraminifera
Foraminifera are single celled protozoans that build a 'test' ('amoebas with a shell' would be a good description, even if it is not scientifically accurate). They live in most salt water environments, either in the sediment, on the sediment surface, attached to rocks, plants or animals or free floating ('plank-tonic'). The tests can be made of sediment grains or secreted calcium carbonate, and come in a wide variety of shapes.
The test can have one or several chambers. Simple forms have one chamber in the shape of a tube, vase or spiral. Multi-chambered forms can have the chambers in a straight or curved line, can be spiralled or helical or even more complex.
From a practical point of view they can be split into four categories.
'Agglutinated' forams build a test of sediment grains and are 'benthonic' (dwell at the bottom of the sea). Calcareous forams can be split into three groups : 'Benthonic' which live on or in the sediment, 'Planktonic' forms which float freely in different parts of the water column and 'Larger' forams which build large many chambered tests and can seen without the aid of magnification.
Ostracods.
Ostracods are bivalved crustaceans and could be crudely described as being small shrimps in a mussel shell'. They live in freshwater and marine environments and are free-swimming or bottom dwelling. The two 'valves' are held together by muscles, and the attachment sites (muscle scars) are useful for identification purposes.
Palaeoenvironments.
The type of microfossils you find can tell you a lot about the depositional environment. Foraminifera only live in marine or brackish water environments. Some planktonic forams are indicators of water depth. Some species of ostracod are very good indicators of salinity.
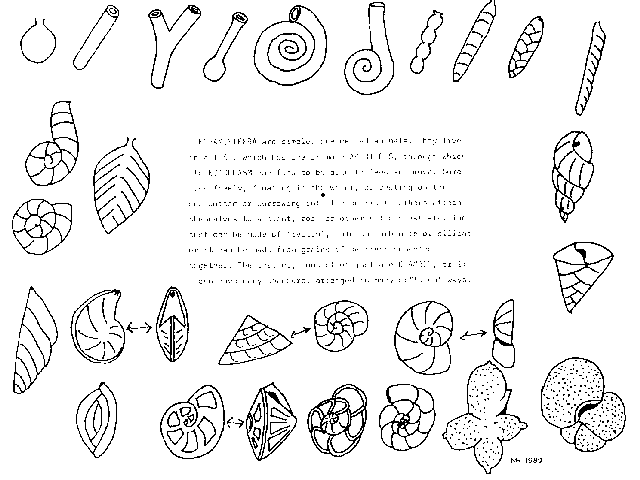
The following paragraph originally
appeared within the foraminifera graphic. Since it is not very clear on the
scanned image it is reproduced below.
(online ed.)
Foraminifera are simple, one celled animals. They live in a test, which has one or more apertures, through which its ectoplasm can flow to be able to feed and move. Some live freely, floating in the water, or resting on the sea bottom or burrowing into the sediment. Others attach themselves to a plant, rock or other solid substrate. The tests can be made up of 'tectin', calcium carbonate or silica; or it can be made from grains of sediment cemented together. The test may consist of just one chamber, or it can have many chambers, arranged in different ways
References
Neale J W 1970. Microfaunas and some aspects of the Speeton Clay environment. p66-81 of Oertli H J (ed.) Paleoecologie Ostracodes. Bull.centreres. Pau - SNPA 5 suppl.
Brasier MD, 1980
- Microfossils,
George Allen & Unwin.
Notes from
Fossils
through the Microscope 2001 to 2010
adult education class
Copyright Hull Geological Society. 2018
If you enjoyed
reading the article please consider joining the Society
or sending a donation.