Mike Horne FGS
Fossils through the microscope course
tutor Mike Horne
You will require the folowing items for microfossil practical work:
A very fine, good quality artists' paint brush, size "00" or "000".
A pair of tweezers
A clean lemonade or squash bottle top.
A 'picking tray' that you have made in advance (instructions below)
A teaspoon or spatula.
Glass sample tubes or sealable plastic bags
Cavity microscope slides
Some water (preferably de-ionised)
Making a 'picking tray'.
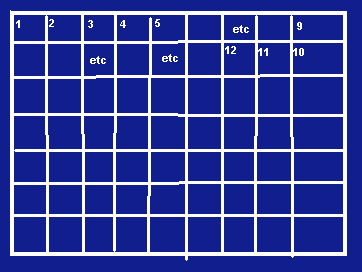
Get a piece of stiff card, with a darkish matt (not glossy) surface, about 10 x 7 cm in size. Then with a sharp pencil draw a margin of about 5 mm around the sides of the card, and then inside the margins draw a grid of horizontal and vertical lines about 6 or 7mm apart. Then number the squares in your smallest writing starting at one along the top line left to right and then continue along the second line from right to left. It does not have to look pretty, but will probably be better than this example :
If you find that you like micropalaeontology and once you get used to it you will probably find that you will want to make better quality tray that suits your own preferences. I prefer to use a metal tray painted matt black or dark blue, with numbering in white ink. But that may be because I study chalk microfossils that are white, and perhaps I worked on different material I would choose a different combination that would be easier on the eyes.
We will be sprinkling samples of prepared sediment very thinly on to the card and then looking at the sediment in each square of the tray to look for microfossils. When we find some we pick them up using the dampened paint brush and put them into a sample tube or special microscope slide. The fossils are less than 1 mm in size. We will be looking at foraminifera and ostracods. Remember - Do not sneeze or you could loose a whole days work!
SAFETY - the glass sample tubes can break - be vary careful not to cut your hands when stoppering them.
Using the microscope -
WARNING - the microscopes and lamps are very expensive: use both hands to carry them. Set the lamp to "low" before turning it on and then turn it up if you need more light.
It is extremely important that you set everything up to suit yourself - because you could be doing this practical work for hours at a time and so you want to avoid back ache and eye strain. So ideally you want the chair you are sitting on, the table, the microscope and accessories at the right height so that you are not bending over the microscope. You must set the microscope and lighting so that you are getting the best lighting, but no glare.
You must set the eyepieces of the microscope so that they are the right distance apart. You must focus the microscope properly - one lens can be focussed independently (like on a pair of binoculars). So with one eye closed focus the fixed lens using the microscope's focusing knob; then with the other eye closed focus using the adjustment for that eyepiece. That way the microscope is in focus for both your eyes.
copyright Mike Horne - June 2023