Notes on Geological Logging.
tutor: Mike Horne FGS
for the Centre for Life Long Learning
For logging in the field:
Introduction -
Geological logging is the fine-scale observation and recording of a sequence of rocks exposed in a quarry face or coastal cliff. The same techniques are used when dealing with borehole cores.
First read my introduction to geological fieldwork and if you are attending my class at the University you must read and understand my risk assessment for fieldwork.
Things you will need - A notebook and pencil, a large clear plastic bag, a tape measure (3 or 4 metre steel tape), a clipboard and blank logging sheets. Other things that would be useful include - a compass, a clinometer, a camera, a hammer, a trowel, sample bags, a longer tape, a grain size scale.
Logging an exposure:-
First have a look at the whole exposure to get an idea of the different rock types and a 'feel' for them. try to work out how they fit together in the bigger picture - are there definite groups of beds making up a Member or Formation? Don't worry if you cannot decide yet, you will have to review it after you have completed the logging.
Decide on a plan of action. This may depend on safety as much as anything else. For instance you may have to ensure that you log the lowest beds of a coastal section at low tide. Or you may have to log certain beds at one bench of a quarry because access is safer than other parts where the exposure is better. After considering the safety then decide where the best sections are. If there is variation in bed thicknesses across the exposure I recommend that you choose the thickest ones to measure.
You need to make a record of the following - locality name and grid reference, site owner if known, the date and some memory-jogging facts. Make a quick record in your notebook of the rock types, approximate thicknesses, structures, dips, etc.
Then start logging - it is probably best to go from the base upwards, if not work from the top down or choose a easily recognisable bed that you can trace throughout the whole exposure.
For each bed -
Define the base and top.
Measure the thickness accurately from the base to the base of the bed above in centimetres.
Note any variation in thickness across the exposure.
Record the rock type (Lithology):- What colour is it? Is it hard or soft? What is it made of? What are the grains made of? Are the grains all the same? If not all the same - roughly what's the percentage of each element? If it is a limestone does it contain ooliths (like fish eggs), pellets (pooh shaped) or shell fragments. Are the grains well rounded or angular? Are they well sorted or poorly sorted? How does it weather?
Record the grain size (in millimetres). [grain sizes are Clay - less than 2 um, Silt 2-63um, Fine Sand 63-250um, Medium Sand 250-500um, Coarse Sand 500um-2mm , Gravel >2mm]
Record any vertical or lateral variation in lithology or grain size - such as graded bedding.
Record any sedimentary features - such as cross bedding. Record directions and angles. Are there any erosion surfaces or channels?
Pay very careful attention to the base - is it flat or are there signs of erosion.
Pay vary careful attention to the top - are there burrows in it or fossils encrusting it (indicators of a Hardground)?
Record any fossils in general - note any groupings or orientations. What sort of fossils are they? How did they live (for example: in the sediment = benthic infuana; on the sediment = benthic epifauna; floating = planktonic; swimming = nektonic)? What is the mix (rough percentages)? Is there a dominant fossil? Are they in growth position? Do they show any signs or borings or predation? Are the fossils complete, disarticluated or broken (indicators of life or death assemblages)?
Record any specific fossils that might help in biostratigraphy (e.g. ammonites).
Record any trace fossils and their orientation.
Take any samples you need AND NUMBER THEM. You might want rock samples to make thin sections, carry out tests or look for microfossils. You might want some fossils for detailed identification. BUT remember not to over collect or disfigure the exposure. Make a note of the sample number in your records.
If you take photographs or make drawings of any detailed structures or in situ fossils make a note in your records.
Give the bed a number - remember to number the beds from the bottom of the sequence. If you are not starting at the bottom and have not counted the beds then give the bed you start with a number that seems most appropriate and then work up or down from there.
Then start on the next bed.
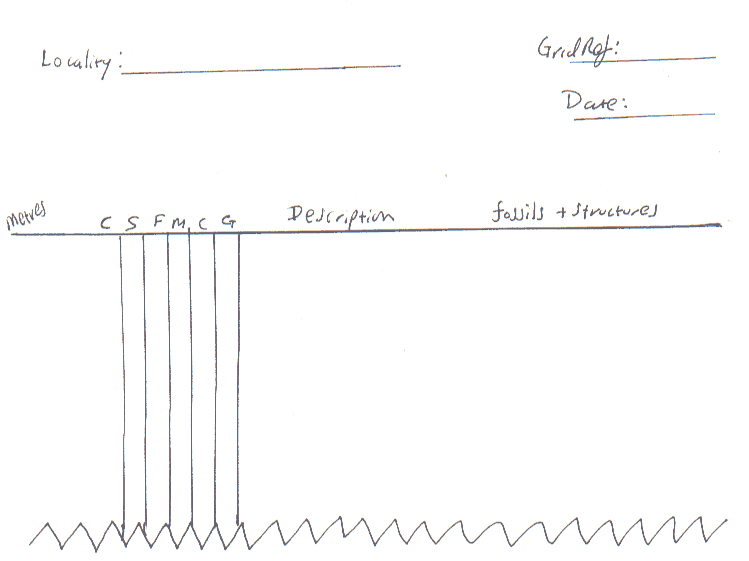
You can record your observations and measurements on a logging sheet. Here is an example :-

It does not have to look pretty or be to scale. But it might help you understand what is going on with the rocks if it is roughly to scale. You should draw up a neat copy when you return home.
If possible show the grain size graphically on the log. You will notice that there is a vague correlation between grain size and the wearthered profile of the rock face. But if there is little variation in grain size you could use the hardness or resistance to weathering graphically to separate the rock types. For instance in my reserach into the Chalk - the chalk, marls and flint have similar grain sizes by different hardnesses.
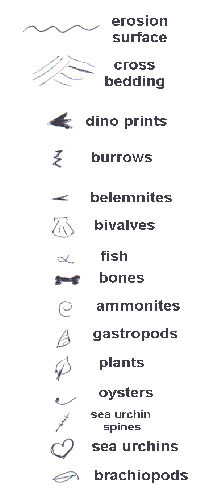
You can use your own abbreviations and symbols on the log. The use of symbols makes the neat version easier to understand at a glance. There is no official "standard" to follow, but do have a look at other peoples' work and try to follow conventions if you spot them. You can use ornamentation to indicate the rock types (similar to the ornament on cartoon maps):- brickwork for limestones, dots for sandstones, thin lines for shales, dashes for clays or mudrocks, circles for conglomerates or gravels, triangles for breccias, and so on. Always put a scale on the neat copy and include a key explaining the symbols you have used. Here are some examples-

When you are doing the neat copy you may want to renumber the beds, group them into members and formations and include any biostratigraphy. If you can relate your section to previously published work then you can use the names given to the rocks (assuming you agree with the author), if not it is perfectly acceptable to number or letter the members and formations - e.g. Member A1 of Formation A. You can always revise it again if you wish to publish your work.
Boreholes-
If you are logging a borehole, then you can follow the general principles above, but start your log at the top and work down, including the bed numbering.
copyright Mike Horne - 2019
Hull Geological Society Home Page Geology Courses Homepage